
What Contact Connectors Are and When to Use One
Your customers' numbers probably already live somewhere: a spreadsheet, a phone, an online store or a Google account. SmartEngage can bring them in either from a file you upload or by connecting to the tool that holds them. This guide explains the difference, what each connected source needs, and how to decide which route to take.
SmartEngage
Every way of adding contacts in bulk sits behind one button: Import Contacts, on the Contacts page. Whichever source you pick, the import follows the same steps and ends with the same preview, so the choice is really about where your list lives and how often it changes.
Below you will find what a contact connector is, which sources are available, and when a connector is worth setting up instead of uploading a file.
What a Contact Connector Is
When you open Import Contacts and reach the Choose a source step, you see every place SmartEngage can read contacts from. Some sources take a file. Others connect to an account you already use, such as your Shopify store or your Google account, and fetch the contacts from it directly. That second kind is a contact connector.
A connector is set up once. After that, the connection is remembered for your account, so the next time you want the latest customers you choose the source again and fetch, with no export and no file to find.
The Sources You Can Choose From
The Choose a source step groups the sources into three sections:
- From a file: CSV, Excel and vCard. Upload an export from any tool, with nothing to connect.
- Websites and shops: WooCommerce and Shopify. Pull customers straight from your storefront.
- CRM and marketing: Google Contacts, HubSpot and Mailchimp. Bring across the contacts you already keep elsewhere.
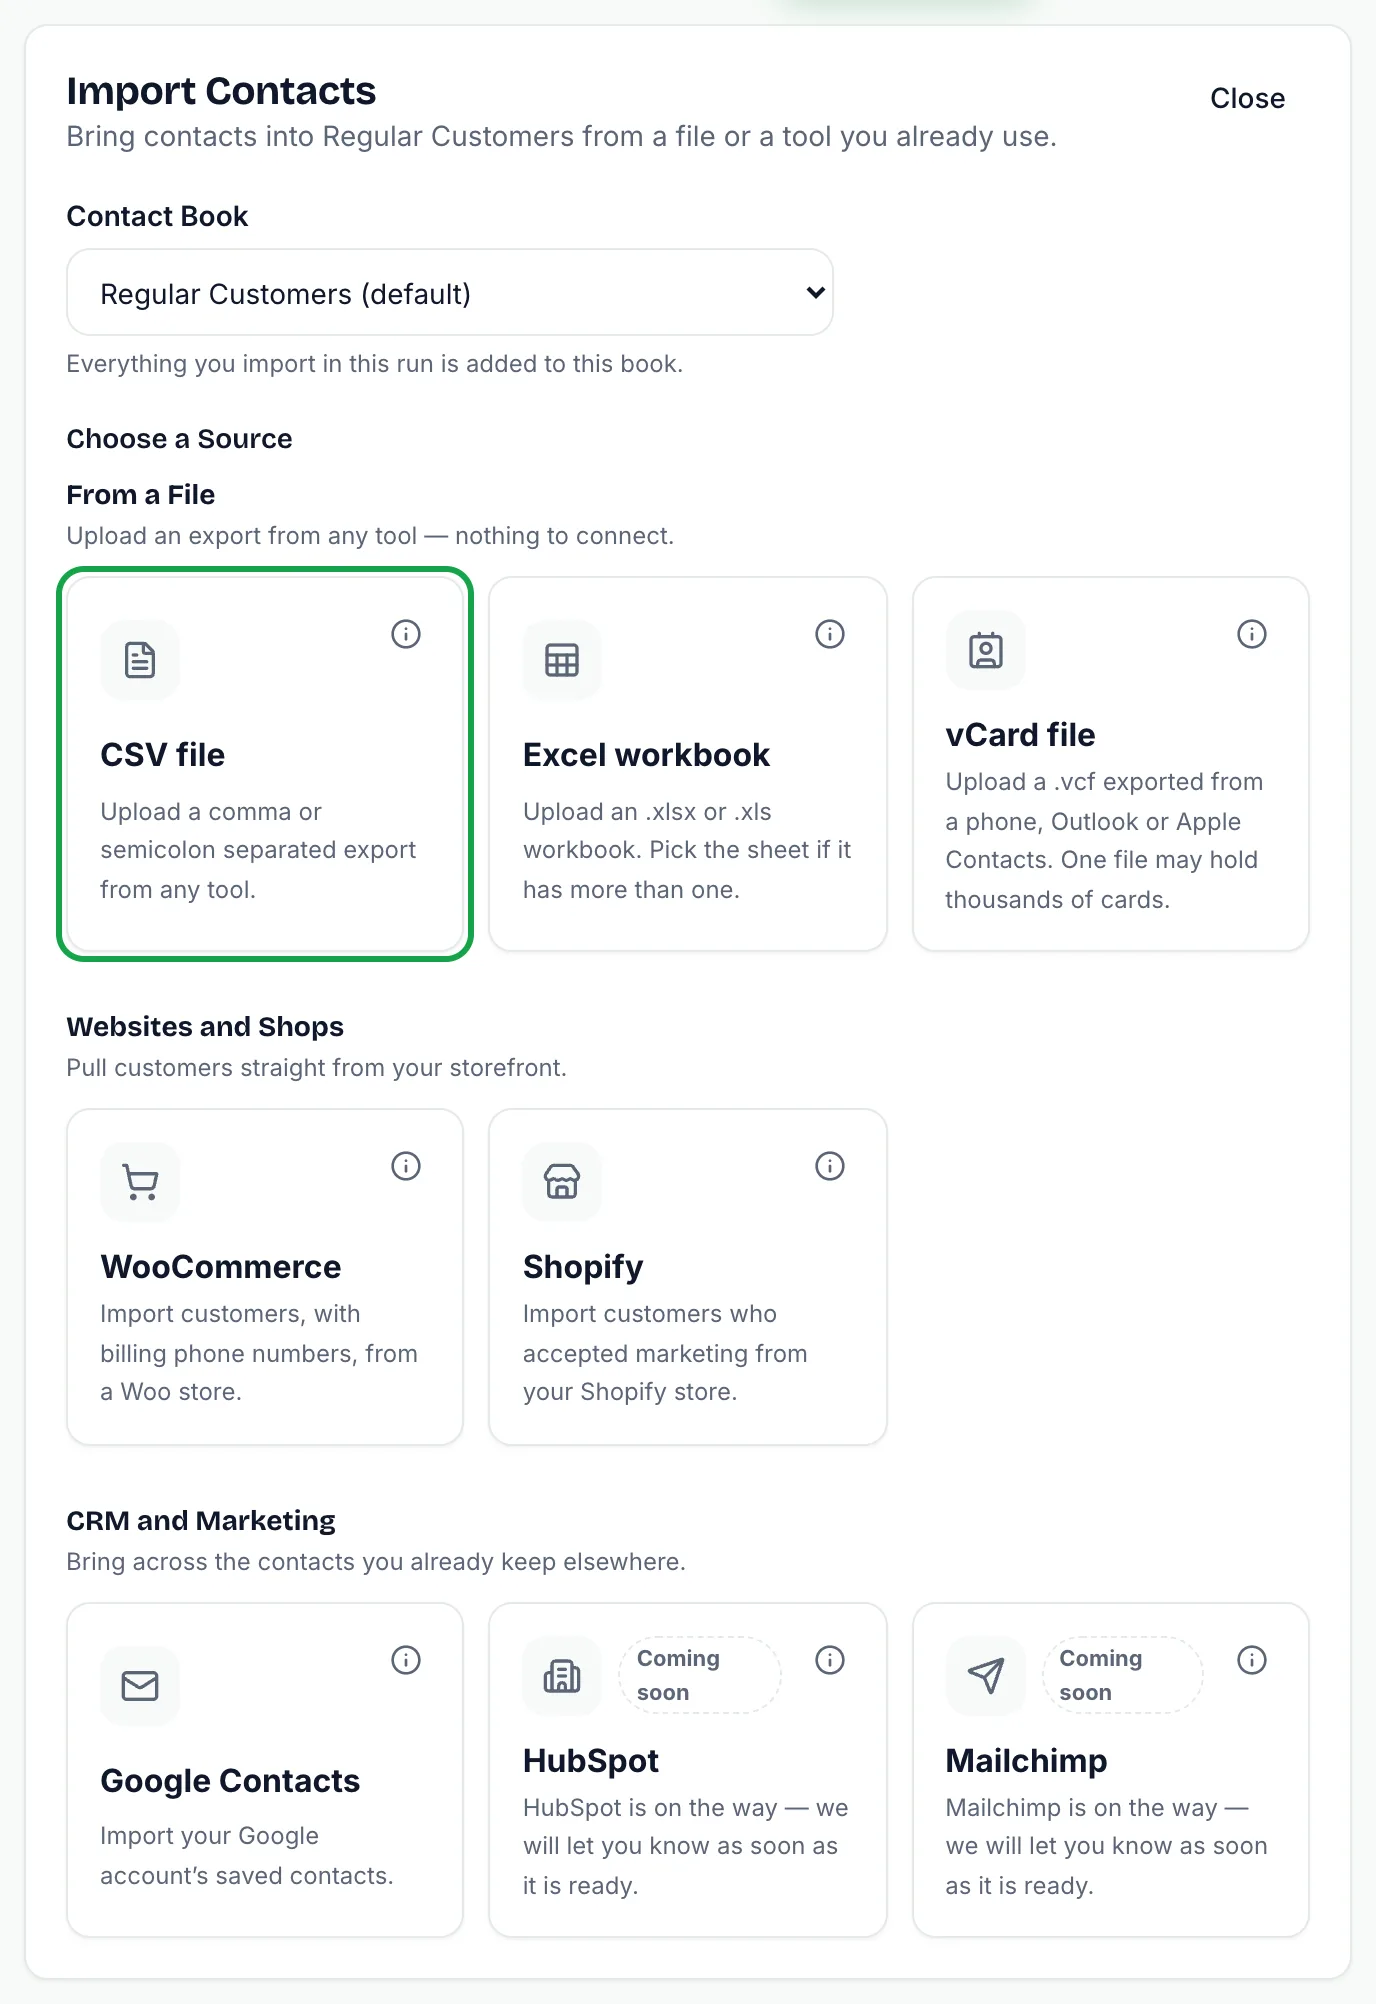
HubSpot and Mailchimp currently show a Coming soon badge and cannot be selected yet. Until they launch, export your list from either tool as a CSV file and upload that instead.
File Upload or Connected Source: The Difference
Both routes end in the same place: a preview of exactly what will be imported, and nothing written until you press the import button. What differs is how the contacts get there.
With a file, you control the columns. You export from your tool, upload the file and match its columns to contact fields. Each file source also offers a sample file to download if you are not sure what the file should look like.
With a connected source, SmartEngage reads the fields itself. You connect the account once and then press a button such as Fetch contacts from Shopify. The source's own fields, such as a customer's billing phone number or a contact's job title, are already matched to contact fields for you, and you can still change the matching before you import.
When a File Is the Better Choice
- Your list lives in a spreadsheet or a phone's address book rather than an online tool.
- You are importing once and do not expect to repeat it.
- You only want part of a list and would rather trim it in a spreadsheet first.
- The tool you use is not one of the connected sources, or it shows Coming soon.
Almost every tool can export to CSV, which makes a file the universal fallback.
For the file route step by step, read How to Import Contacts from a CSV File.
When a Connector Is the Better Choice
- Your customers sign up through a WooCommerce or Shopify store, and you want to bring new buyers across regularly.
- Your team saves contacts to a shared Google account.
- You do not want to export, download and re-upload a file every time the list grows.
- You want the source's own fields, such as company, address and notes, carried across without building columns by hand.
How Connecting Works
There are two ways a source is connected, and the screen tells you which one applies.
Approving access on the provider's own site. Google Contacts and Shopify, and HubSpot and Mailchimp once they launch, send you to the provider to sign in and approve the connection. The button reads Continue to, followed by the source's name, with the note that you will sign in on that site and come back. Your password for that site is never typed into SmartEngage. Shopify first asks for your Shop domain, the .myshopify.com address, so it knows which store to send you to.
Entering keys. WooCommerce asks for your Store address, a Consumer key and a Consumer secret, which you create in your WordPress admin. When you press Connect, SmartEngage fetches one customer to prove the key works before saving it.
Either way, the stored credentials are encrypted before they are saved, and the access used is read-only. SmartEngage reads your contacts or customers and does not change anything in the source.
What Happens on Every Import
Whichever source you choose, an import runs through the same steps:
- Pick the Contact book the contacts will be added to.
- Choose the country for numbers written without a country code. Numbers that start with + keep their own.
- Upload the file, or fetch from the connected source.
- Check the Column mapping, and change columns if anything looks wrong.
- Review the preview, which splits the list into Found, New contacts, Duplicates and Cannot import.
- Select who to bring across and press the Import button, which shows how many contacts will be added.
- Read the result: how many were imported, skipped or could not be imported.
Duplicates are contacts you already hold, matched on the phone number or the email address. They are skipped unless you tick the option to update them. A row with no usable WhatsApp number cannot be imported, and the preview tells you why.
Reading a Connector's Card
Each source is a card on the Choose a source step, and the card tells you its state at a glance:
- Connected: the source is ready to fetch from. The card also shows which account or store it is connected to.
- Reconnect: the authorisation has expired or been withdrawn, and you need to connect again.
- Coming soon: the source is not available yet.
- A greyed-out card with a reason: the source is not available on this workspace right now.
Every card has an information button that opens a short guide to that source: what you need before you start, the setup steps, and which fields come across.
A Connector Is Not a Live Sync
Connecting a source does not copy new contacts automatically. Each fetch is a snapshot of the source at that moment. When your store gains new customers, choose the source again and fetch. Contacts you already hold show up as duplicates and are skipped, so only the new ones are added.
Disconnecting a source removes the stored authorisation from SmartEngage. The contacts you already imported stay in your contact books.
A Note on Consent
Being able to import a list is not the same as having permission to message it. Only import people who have agreed to hear from you on WhatsApp. Messaging people who never opted in leads to blocks and reports, and that damages your number's quality rating.
Unless the source says otherwise, imported contacts are marked as opted in, so it is worth being selective in the preview. Contacts who have opted out in SmartEngage, including anyone who replies STOP or UNSUBSCRIBE to your number, are never messaged.
Next Steps
To connect a Google account, read How to Import Contacts from Google Contacts.
For online stores, see How to Import Customers from Shopify or WooCommerce.
Using a CRM or email tool? Read How to Import Contacts from HubSpot or Mailchimp.
Ready to send safely?
Start free — no new number, no setup fee, no card required.
Keep Reading
 Account & WhatsApp Setup5 min read
Coexistence or API-Only: Choosing How to Connect Your Number
There are two ways to connect a WhatsApp number to SmartEngage. One keeps the WhatsApp Business app working; the other ends the number's life in the app for good. Here is how to choose.
Read article Contacts6 min read
Duplicates, Invalid Numbers and Opt-outs Explained
Why some rows in a SmartEngage import are skipped or refused, how duplicates are detected, what makes a number invalid, and what opting out actually does.
Read article Contacts6 min read
How Contacts and Contact Books Work in SmartEngage
What a contact holds, what a contact book is, and how the people you keep in SmartEngage become the audience for a WhatsApp campaign.
Read article