
How to Schedule a Campaign
You do not have to be at your desk when a campaign goes out. SmartEngage lets you pick a date and time, and the campaign starts on its own, whether or not you are signed in. This guide shows how to schedule a campaign, what happens at the scheduled time, and what your options are if plans change.
SmartEngage
Good timing matters on WhatsApp. A message that arrives while your customers are free to read it does better than one that lands in the middle of the night.
Scheduling lets you build a campaign when it suits you and send it when it suits your customers. The rules are simple, but a few of them are worth knowing before you rely on them.
Step 1: Build the Campaign as Usual
Start from Campaigns and press "New Campaign". Complete the first two steps, "Campaign & Message" and "Audience", exactly as you would for a campaign you send straight away.
If this is your first campaign, begin with How to Create a WhatsApp Campaign.
For the audience step, see How to Choose Who Receives a Campaign.
Step 2: Choose Schedule for Later
On the Schedule step you see two options:
- Send Now: starts the moment you confirm on the last step.
- Schedule for Later: goes out on its own, whether or not you are signed in.
Choose "Schedule for Later" and two fields appear, Date and Time. They are filled in with a suggestion about half an hour from now, rounded to the next hour or half hour, which you can change.
Step 3: Pick the Date and Time
Times are entered in your own timezone, and the step says which one, for example "(GMT+01:00) Europe/London". Once you pick a valid time, a line confirms when the campaign starts in full, so you can check the date is the one you meant.
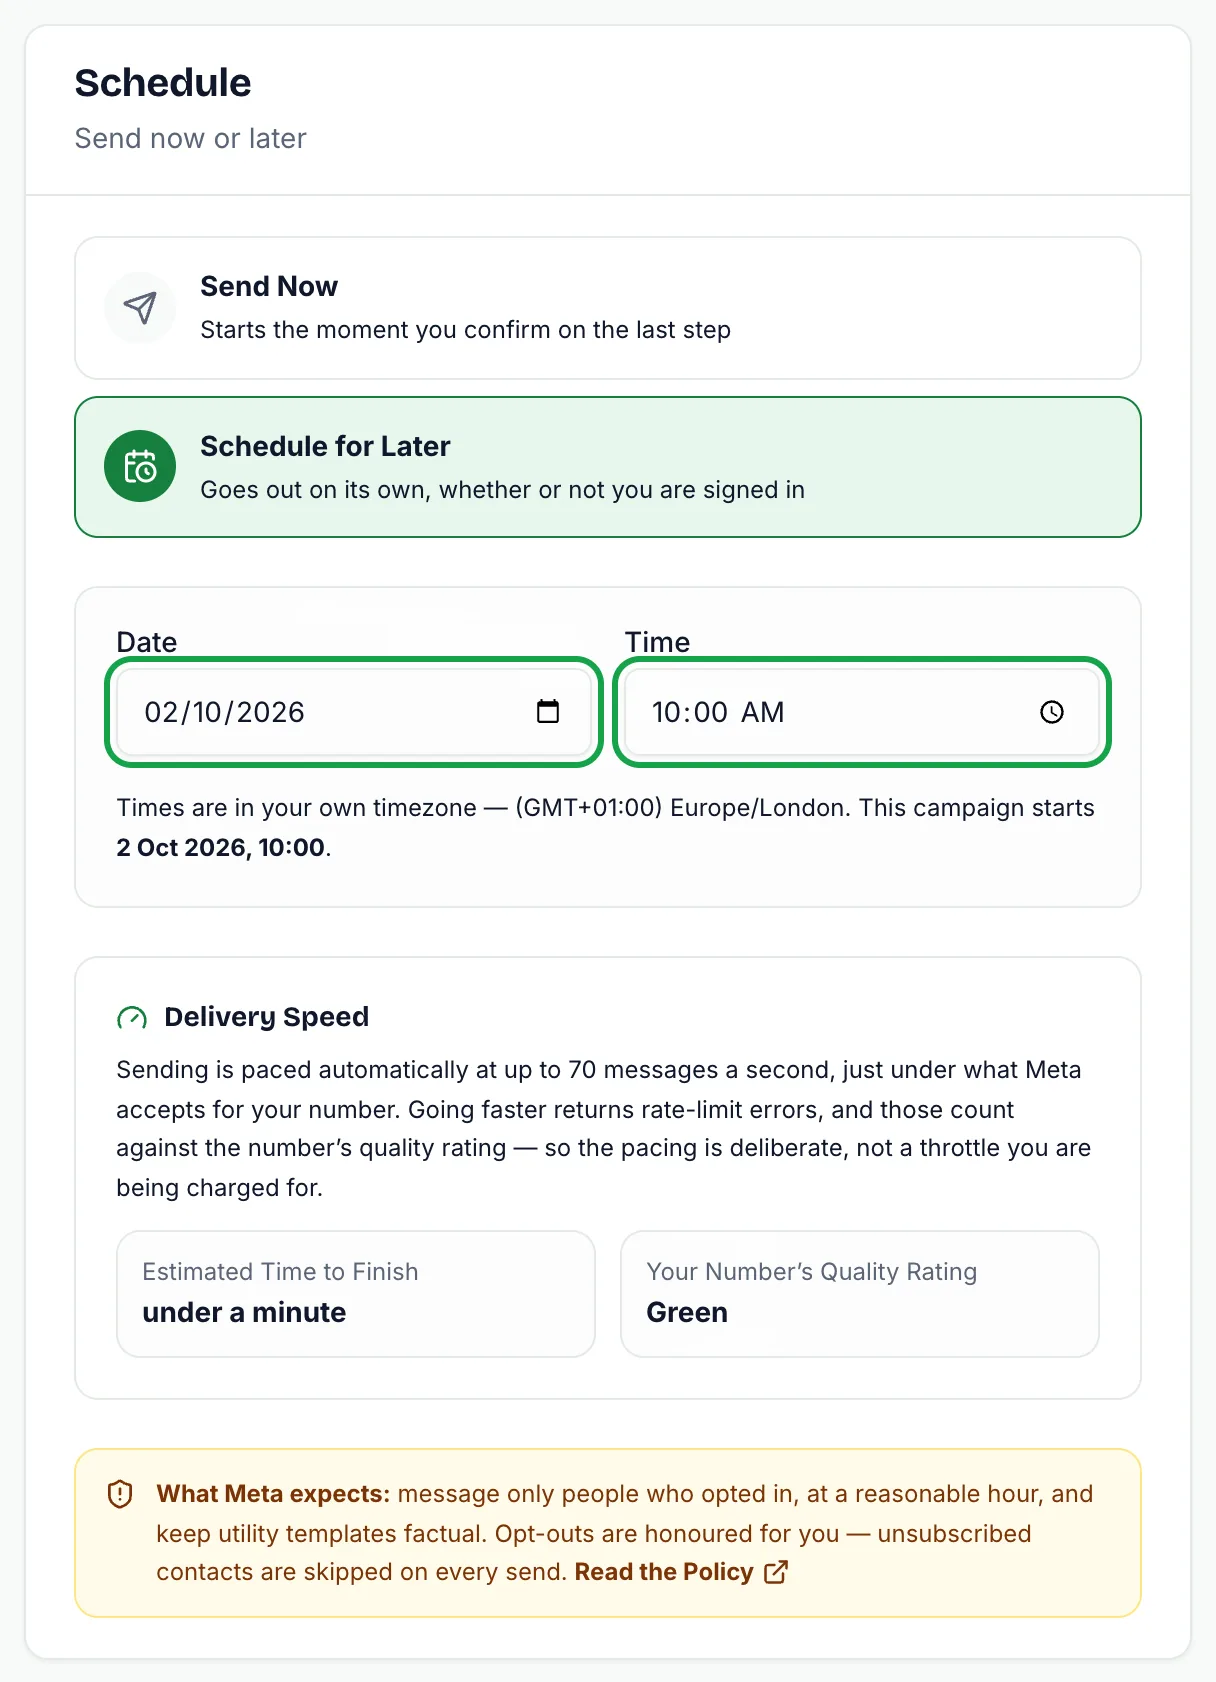
The time must be at least a few minutes ahead. If it is too close or already in the past, the step asks you to choose a time at least a few minutes from now. SmartEngage checks the time again when the campaign is created and refuses one that is no longer in the future.
If you close the wizard and come back later, a draft whose chosen time has since passed switches back to "Send Now" rather than keeping a time that would be refused.
Step 4: Review and Schedule
The Review & Confirm step states how many messages will be sent and on which date. When the Meta Readiness Check passes, press "Schedule Campaign". The confirmation box repeats who will receive which template and reminds you that it goes out at the time you chose, whether or not you are signed in. Press "Schedule It" to finish.
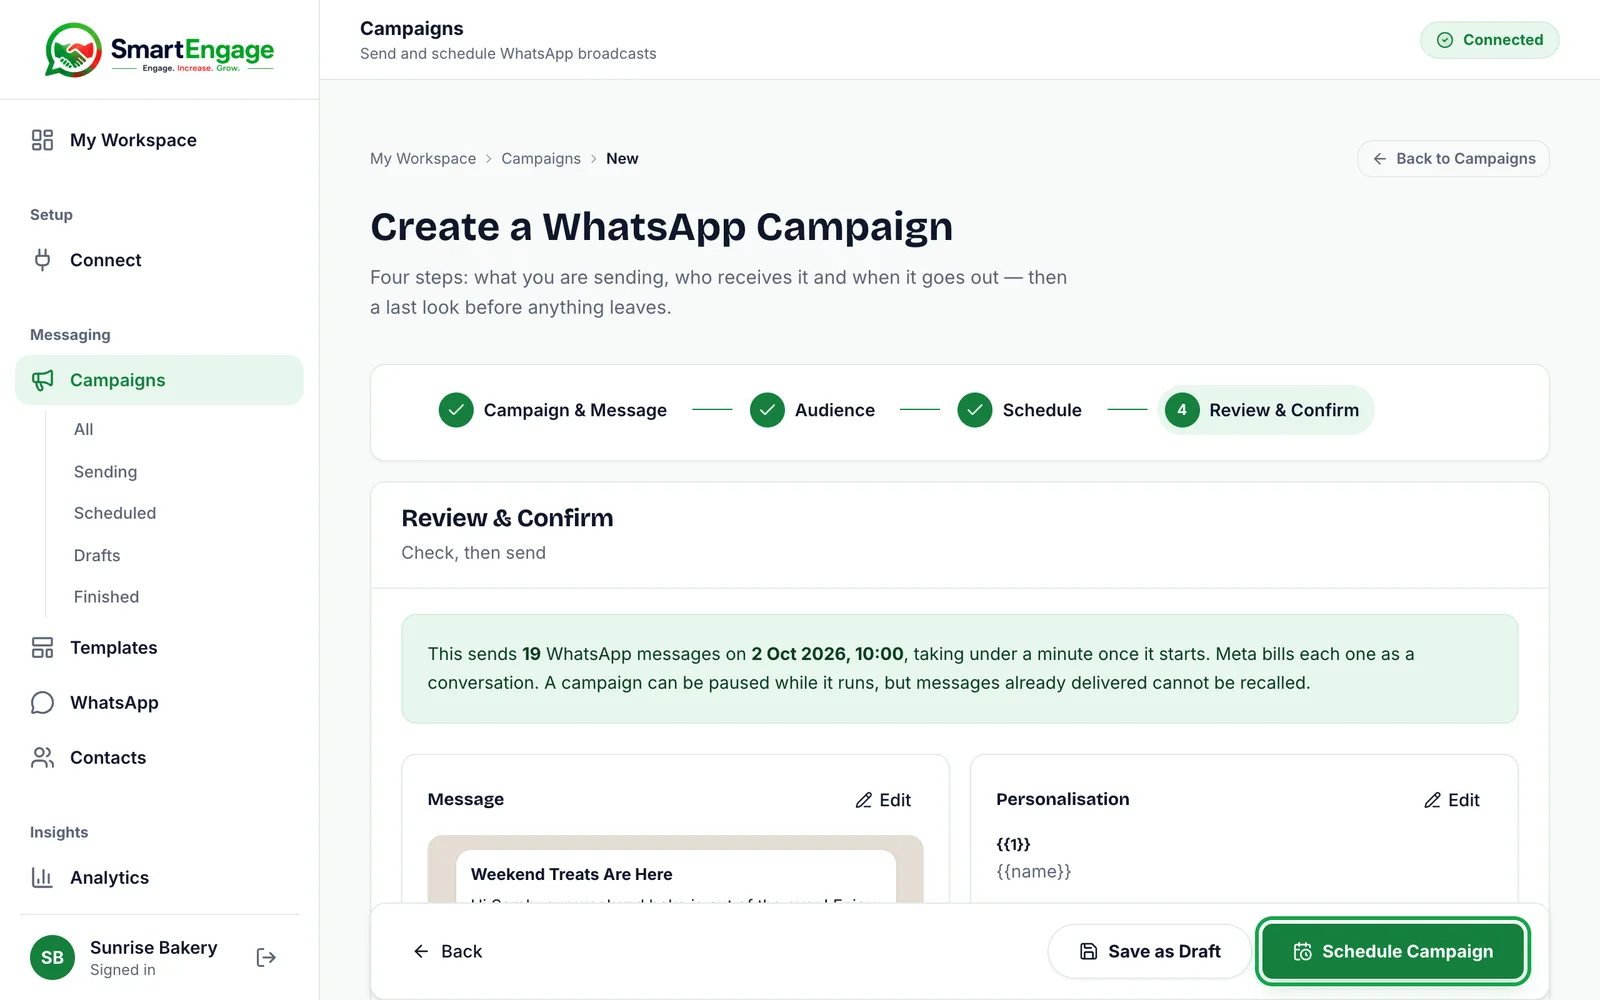
One thing to avoid: "Save as Draft" does not keep a scheduled time. A draft saved that way waits until you start it yourself. If you want the campaign to go out on its own, use "Schedule Campaign".
Where Scheduled Campaigns Appear
Scheduled campaigns have their own tab in your campaign list, Scheduled, described as "Waiting for their send time. These start on their own." Each card shows "Starts" followed by the date and time.
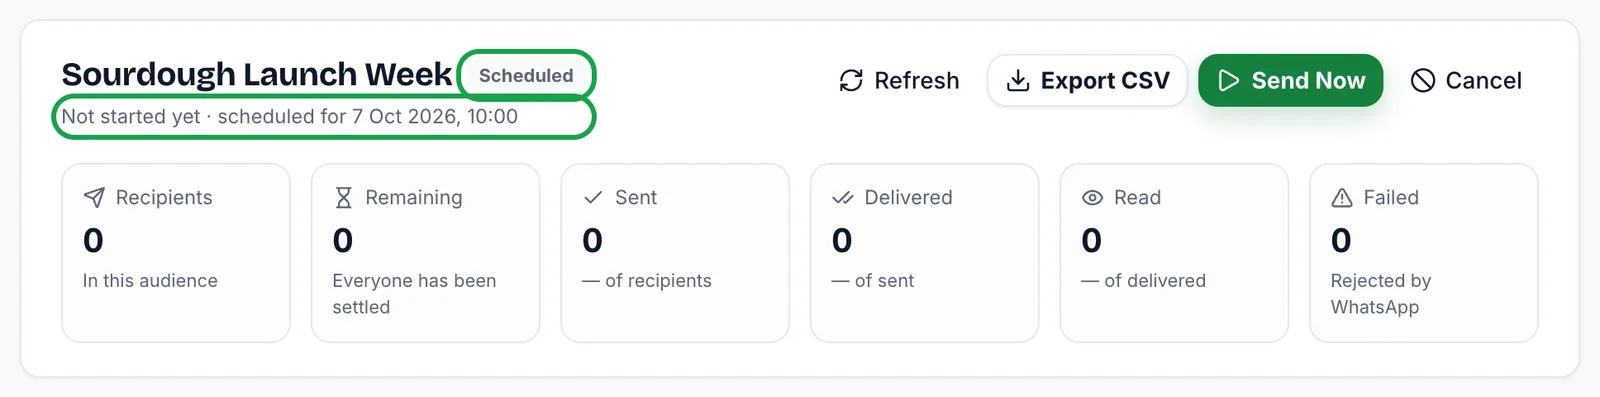
The status badge on a scheduled card reads "Scheduled", which sets it apart from an unfinished draft. Open its report and the header shows the same badge, with "Not started yet · scheduled for" followed by the date and time it will start.
What Happens at the Scheduled Time
SmartEngage looks for campaigns that are due every 30 seconds, so a campaign normally starts within about half a minute of its time. From then on it behaves exactly like one you sent by hand:
- Your plan is checked for campaigns and recipients left in the current period.
- The recipient list is built at that moment from the audience you chose. Contacts added to the book since you scheduled it are included, and anyone who has opted out is left out.
- The campaign shows "Preparing", then "Sending", and moves to the Sending tab with live counts.
- When every recipient has been attempted, it becomes "Completed" and moves to Finished.
If your plan has no campaigns left when the time arrives, the campaign is not sent. It is marked "Failed" with the note "Not sent: your plan had no campaigns left when it was due. Upgrade or renew your plan, then create the campaign again." A failed campaign cannot be started again, so once your plan has room, create the campaign again in the wizard. Nothing was sent, so nobody receives it twice.
To add room to your plan, see How to Buy, Upgrade or Extend Your Plan.
Changing a Scheduled Campaign
Once scheduled, a campaign's time, message and audience cannot be edited. You have two options on its card:
- "Send Now" starts it immediately instead of waiting.
- "Cancel Campaign", found in the card's ⋯ menu, stops it for good. It then moves to the Finished tab as "Cancelled".
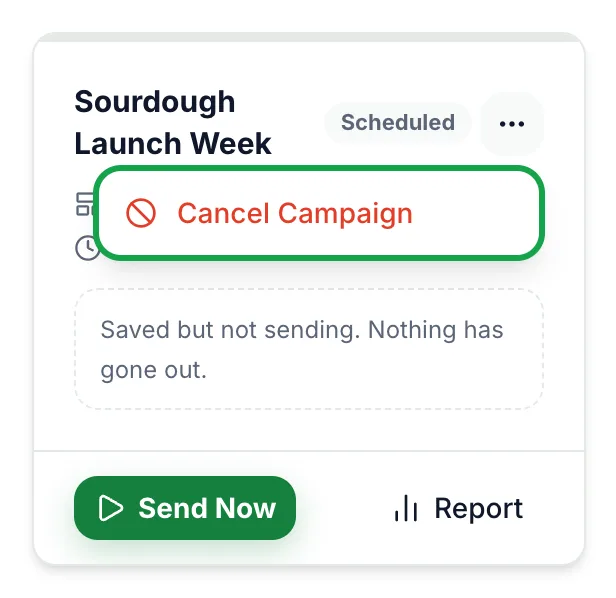
To send at a different time, cancel the scheduled campaign and create a new one with the time you want. Cancelled campaigns stay in your list for your records.
How Fast a Scheduled Campaign Sends
There is no speed or sending-window setting to adjust. The Schedule step shows a Delivery Speed panel with an estimated time to finish and your number's quality rating, and SmartEngage paces the send automatically within what Meta accepts for your number.
Meta also limits how many different people your number can message in a rolling 24 hours. If your audience is larger than that limit, the messages beyond it stay waiting and go out as the window frees up room, so a large scheduled campaign may take longer than a day to finish.
Tips for Scheduling
- Check the date line on the Schedule step before confirming. It is easy to pick the right time on the wrong day.
- Schedule for a reasonable hour in your customers' timezone, not just your own.
- Make sure your template is approved and your Meta payment method is in place well before the send time.
- Avoid scheduling several campaigns to the same people close together. Frequent marketing can be held back by WhatsApp and hurts your quality rating.
For guidance on picking the hour, read The Best Time to Send Your WhatsApp Campaigns.
Next Steps
Once a scheduled campaign starts, you control it just like any other.
Tagged
Bulk MessagingCampaignsTimingReady to send safely?
Start free — no new number, no setup fee, no card required.
Keep Reading
 Account & WhatsApp Setup5 min read
Before You Connect WhatsApp: What You Need
Most failed WhatsApp connections fail for a reason that could have been fixed beforehand. Here is what to have in hand before you click Connect With Facebook.
Read guide Troubleshooting6 min read
Fixing Contact Import Problems
Symptom-by-symptom fixes for SmartEngage contact imports: files that will not upload, wrong column mapping, rejected numbers, duplicates and imports that stop.
Read guide Account & WhatsApp Setup5 min read
How to Add a Payment Method for WhatsApp
Connected but nothing sends? Meta bills WhatsApp messages itself, and needs a payment method on the right business portfolio. Here is how to add one and confirm it in SmartEngage.
Read guide