
How to Create a WhatsApp Campaign
A campaign in SmartEngage pairs one approved WhatsApp template with a group of contacts and sends it from your own number. The create screen walks you through four steps and checks with Meta as you go, so problems show up before anything is sent rather than halfway through. This guide covers each step and what you see on screen.
SmartEngage
Creating a campaign takes a few minutes once the groundwork is done. The wizard asks one question per step: what are you sending, who receives it, when does it go out, and is everything correct.
Below you will find what to have ready, each part of the wizard in order, and what happens the moment you press send.
Before You Start
Three things need to be in place before the wizard can send anything:
- A connected WhatsApp number. Without one, the create screen shows "Connect Your Number First" and a button to the Connect page.
- At least one template Meta has approved. Only approved templates appear in the wizard.
- Contacts to send to, in a contact book or added one by one.
Meta must also be willing to let your account send, which in practice means a payment method is attached to your WhatsApp Business Account in Meta's billing settings. Meta bills its message fees to you directly. The wizard checks this for you, as described in the review step below.
If you have not added one yet, read How to Add a Payment Method for WhatsApp.
Step 1: Open the Campaign Wizard
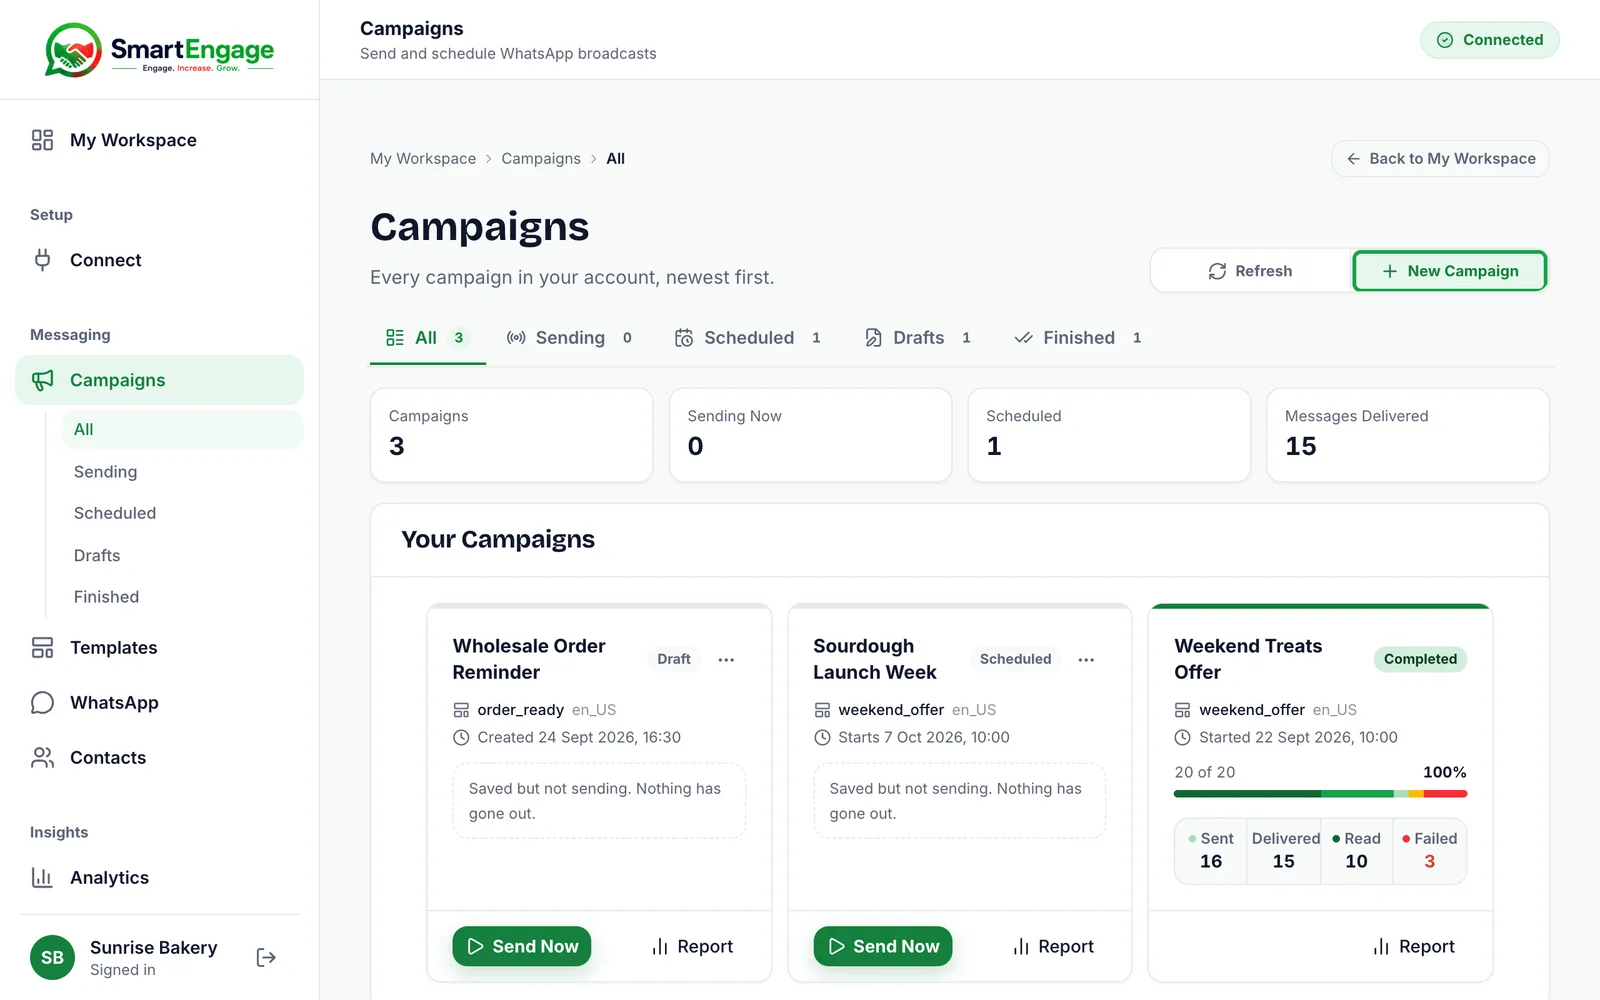
Open Campaigns from the sidebar and press "New Campaign". If you have no campaigns yet, the empty page offers "Create a Campaign" instead.
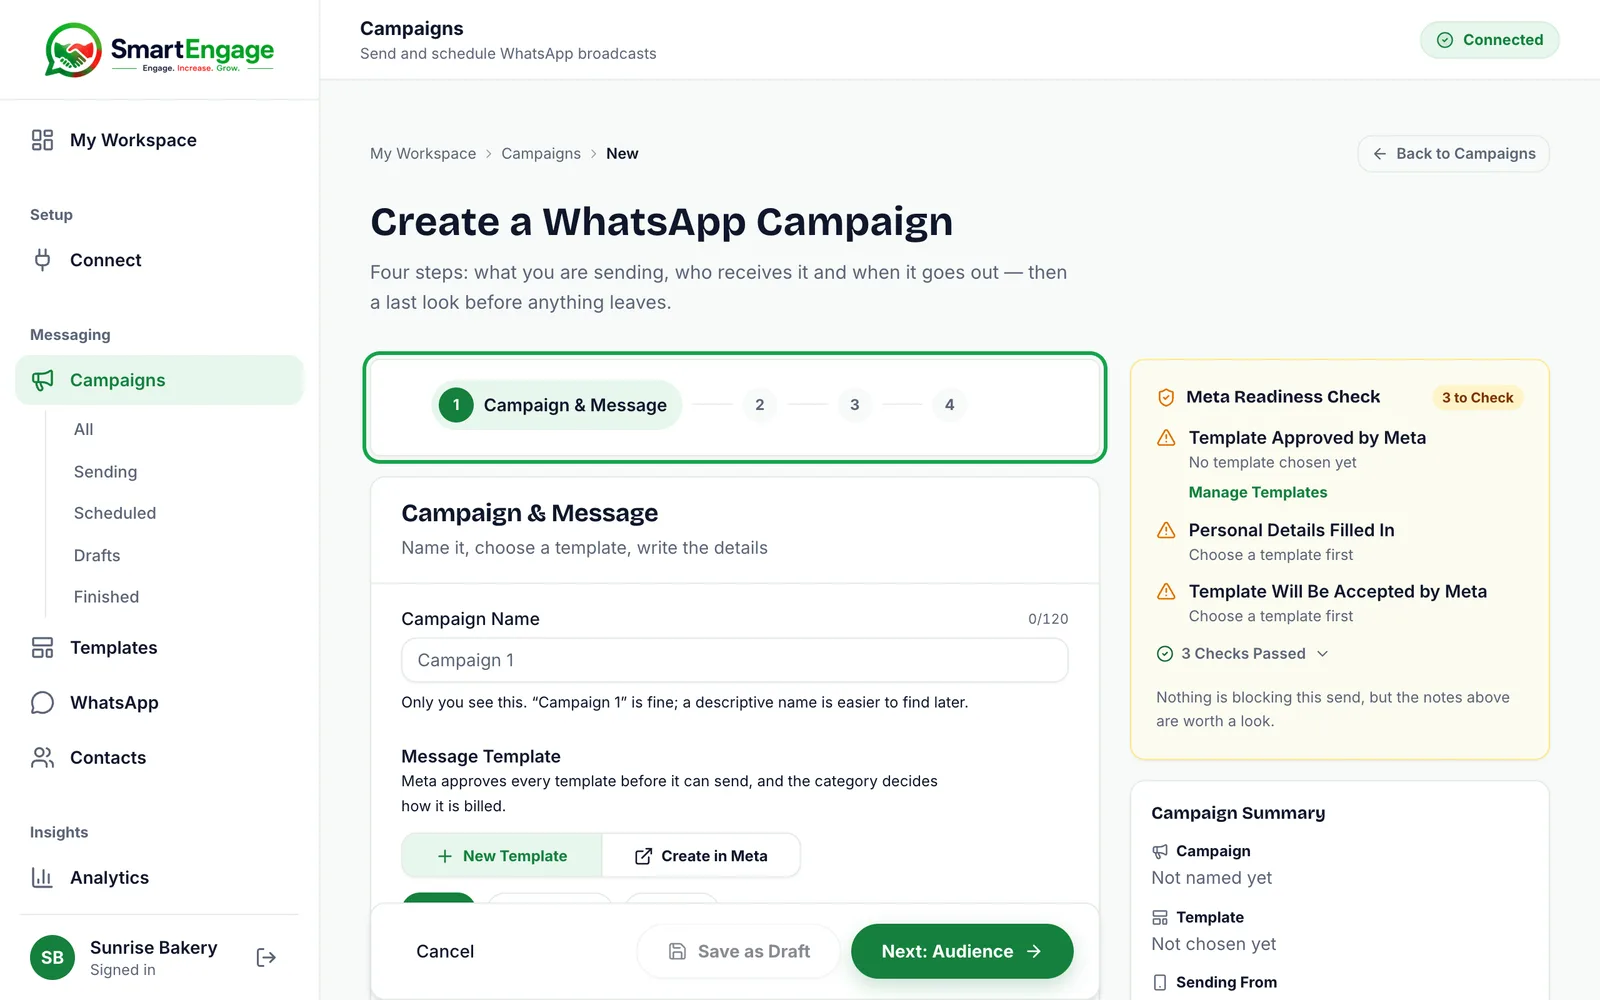
The wizard has four steps, shown across the top: "Campaign & Message", "Audience", "Schedule" and "Review & Confirm". You can click back to any step you have already completed, but you cannot skip ahead, because each step is checked before you move on.
Beside the steps, a panel shows a live Message Preview, a Campaign Summary and the Meta Readiness Check. Your work is saved in this browser as you go, so if you leave to get a template approved or import a list, the draft is still there when you come back.
Step 2: Name the Campaign and Choose a Template
Give the campaign a name in the "Campaign Name" field. Only you see it, and it can be up to 120 characters. A descriptive name such as "March Offer, Wholesale Buyers" makes the campaign easier to find in your list and reports later.
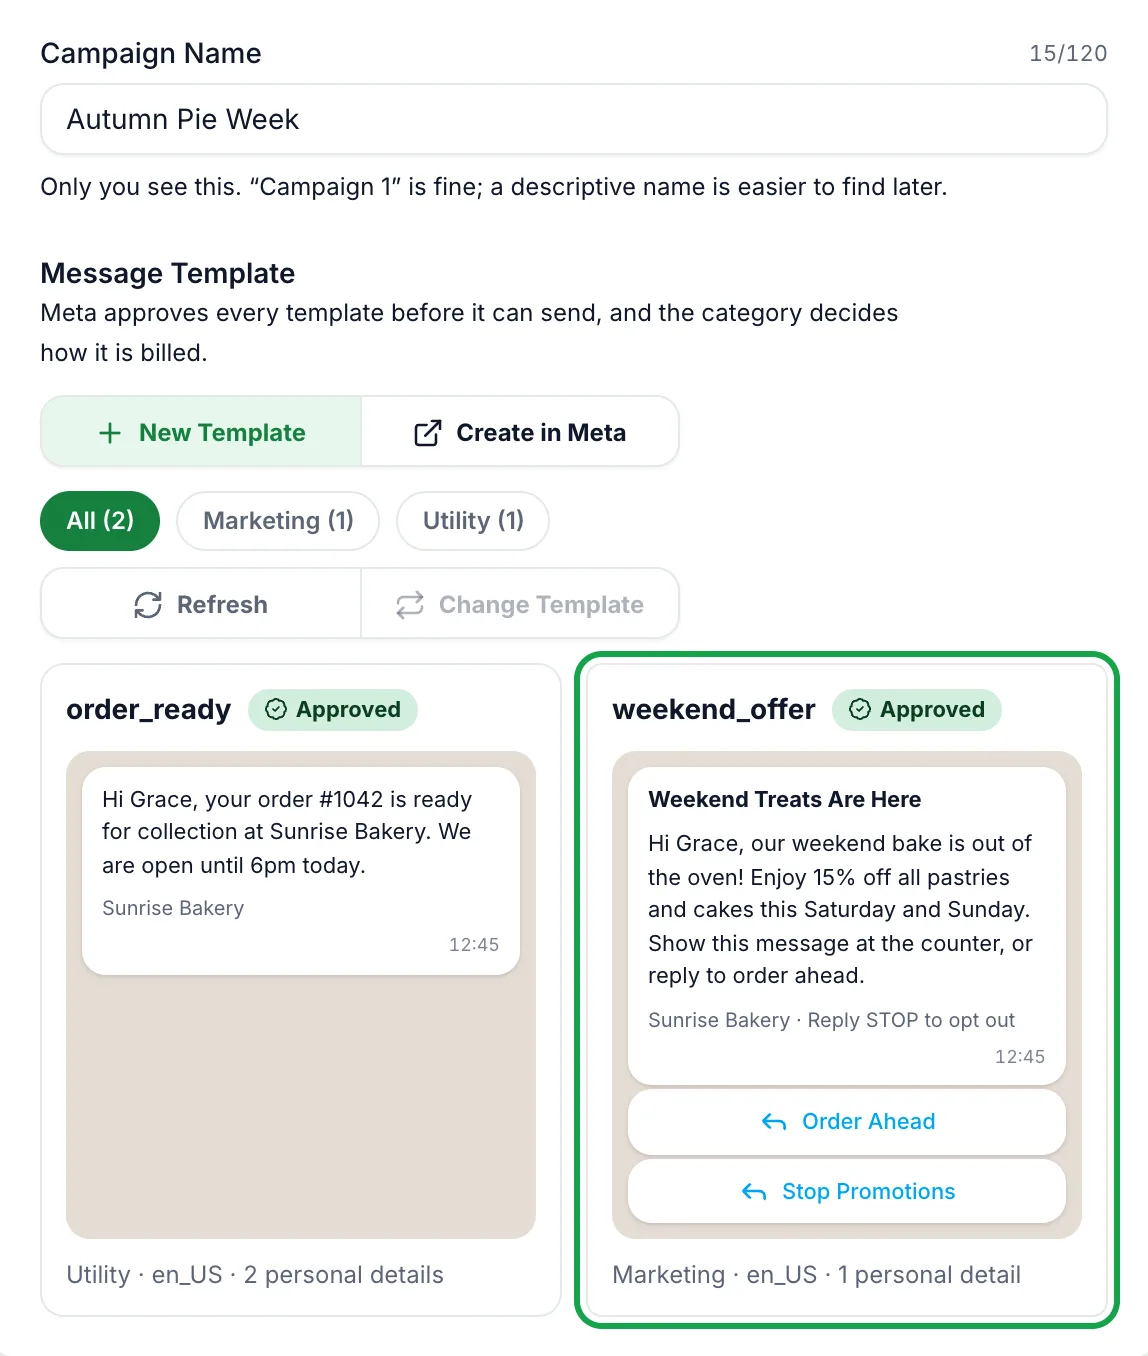
Under "Message Template" you see every template Meta has approved for your account. You can filter the list by category, Marketing or Utility, and search it once you have more than three templates. Each card shows the message as it will look, its category and language, and how many personal details it needs.
Click a template to choose it. The list collapses to your choice, marked "Sending This". To pick another, press "Change Template".
If the template you want is missing:
- "New Template" takes you to the Templates page to write one and submit it to Meta.
- "Create in Meta" opens Meta's own template tool in a new tab, leaving your draft campaign open.
- "Refresh" reads your templates from Meta again, so one you have just had approved appears without reloading the page.
Need a template first? Read How to Create a Message Template.
Step 3: Fill in the Blanks
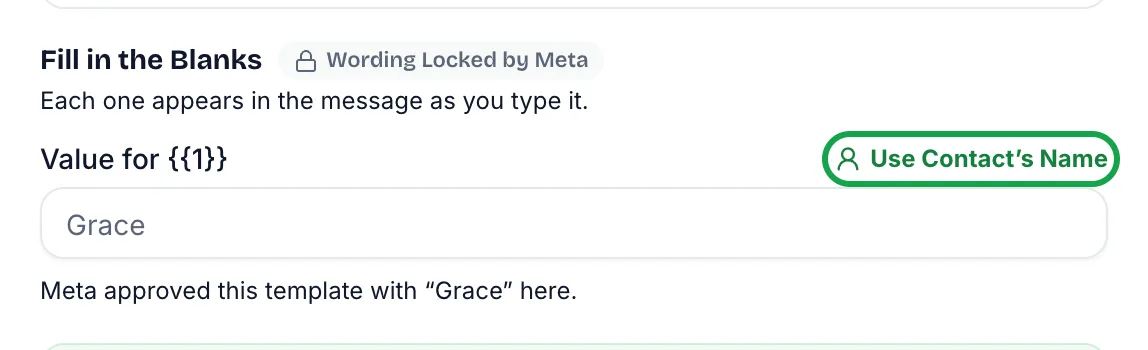
Many templates contain placeholders such as {{1}} and {{2}}. If yours does, a "Fill in the Blanks" section appears beside the chosen template with one field per placeholder, labelled "Value for {{1}}" and so on. The wording around them is fixed, which is why the section is marked "Wording Locked by Meta".
Where Meta approved the template with a sample value, the hint under the field shows it, which tells you what that placeholder was meant to hold. Anything you type appears in the preview straight away.
Where a placeholder could hold a person's name, you can press "Use Contact's Name". Each contact then receives their own saved name, and contacts with no name saved receive "there" instead. Other placeholders are marked "Same for Everyone".
Two rules come from Meta and are checked before you can continue:
- Every placeholder needs a value. Meta rejects an empty one.
- Values cannot contain line breaks, tabs or long runs of spaces.
When the step is complete, press "Next: Audience".
Step 4: Choose the Audience
Under "Send To" you choose All Contacts, one of your contact books, or Specific Contacts you pick by hand. A panel then shows how many people will actually receive the message. Contacts who have opted out are removed from that figure automatically, because they are never messaged.
Audience selection has a few rules worth knowing. They are covered in How to Choose Who Receives a Campaign.
Step 5: Choose When It Sends
The Schedule step offers two options: "Send Now", which starts the moment you confirm, and "Schedule for Later", which asks for a date and time in your own timezone.
The same step shows a Delivery Speed panel with an estimated time to finish and your number's quality rating. There is no speed setting to adjust. SmartEngage paces sending automatically within what Meta accepts for your number.
For the details of scheduled sends, read How to Schedule a Campaign.
Step 6: Review and Confirm
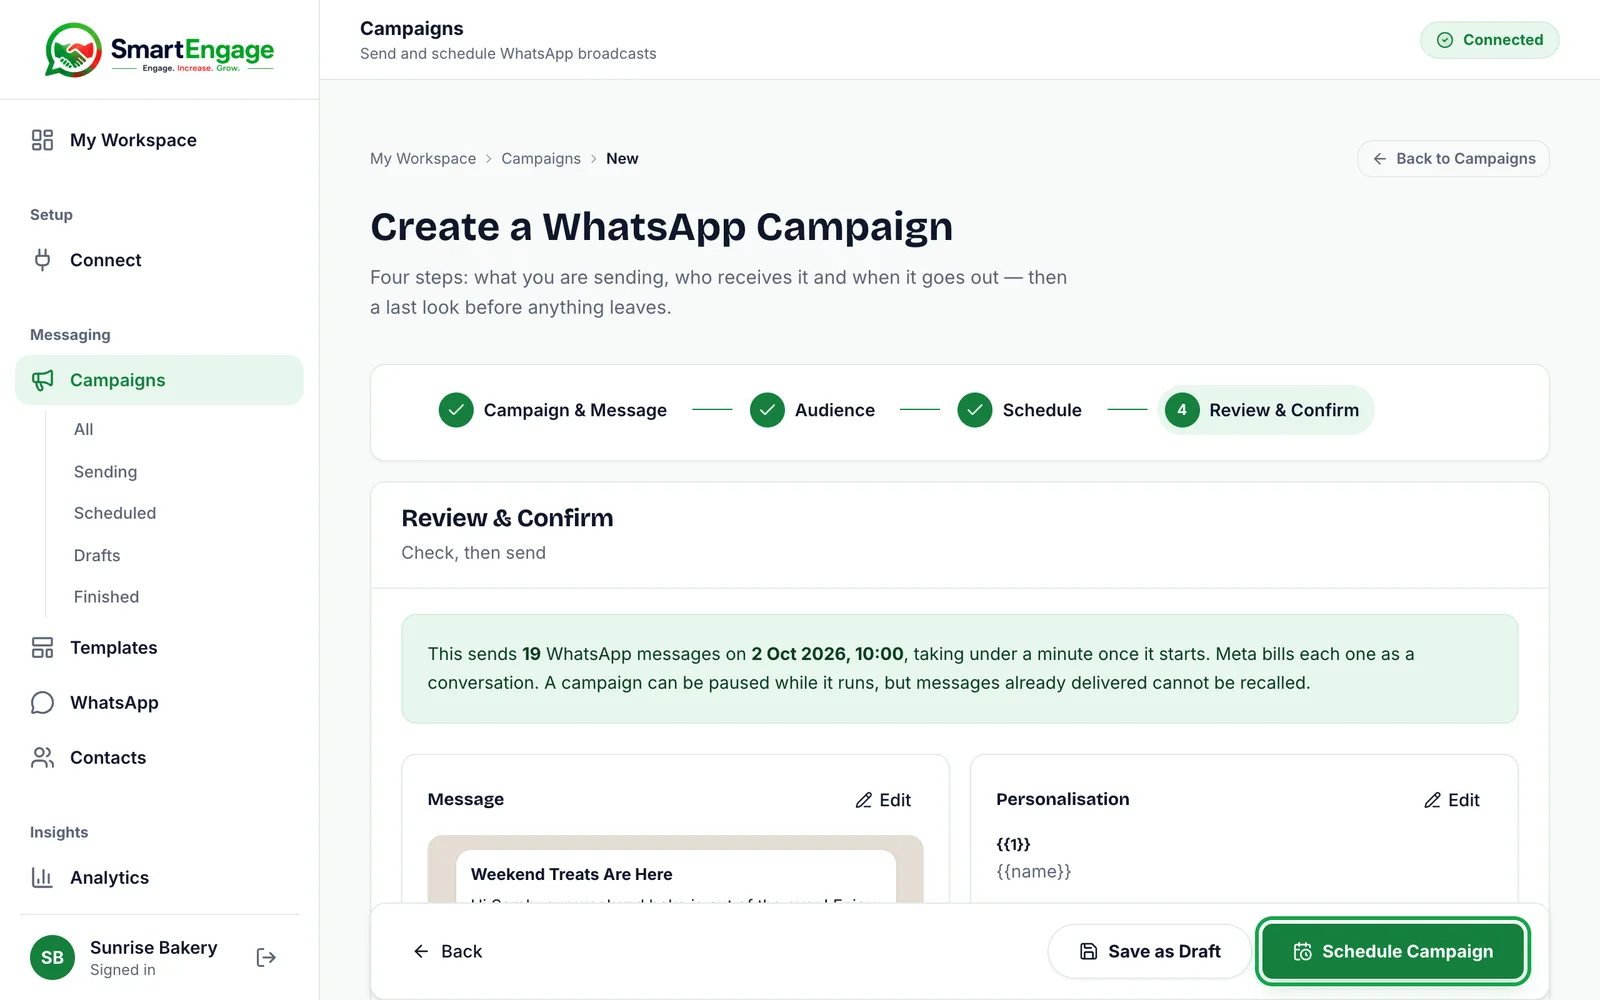
The last step opens with one sentence stating how many WhatsApp messages will be sent and roughly how long it will take. Below it are four panels: Message, Personalisation, What and Who, and the Meta Readiness Check. The first three each have an "Edit" button that takes you back to change them.
The Meta Readiness Check reads from your real connection and template, not from assumptions. It covers:
- WhatsApp Number Connected
- Meta Says This Account Can Send
- Template Approved by Meta
- Personal Details Filled In
- Template Will Be Accepted by Meta
- Number Quality Rating
Its badge reads "Ready" when nothing is wrong, a count such as "1 to Check" when something deserves a look, or a count such as "1 Blocking" when something will stop the send. A blocking line comes with a link to fix it, such as "Check Billing at Meta" or "Manage Templates". A red quality rating also blocks the send, because more marketing from a flagged number risks a block.
When everything passes, press "Send Campaign" (or "Schedule Campaign" if you chose a time). A confirmation box repeats how many contacts will receive which template. Confirm with "Send Now" or "Schedule It". If the button is greyed out, a short line beside it explains why, for example that nobody in the audience can be messaged.
Saving a Draft Instead
If you are not ready to send, press "Save as Draft" at any point after naming the campaign and choosing a template. The campaign is saved without a send time, even if you had picked one, and waits in the Drafts tab of your campaign list. When you are ready, press "Send Now" on its card.
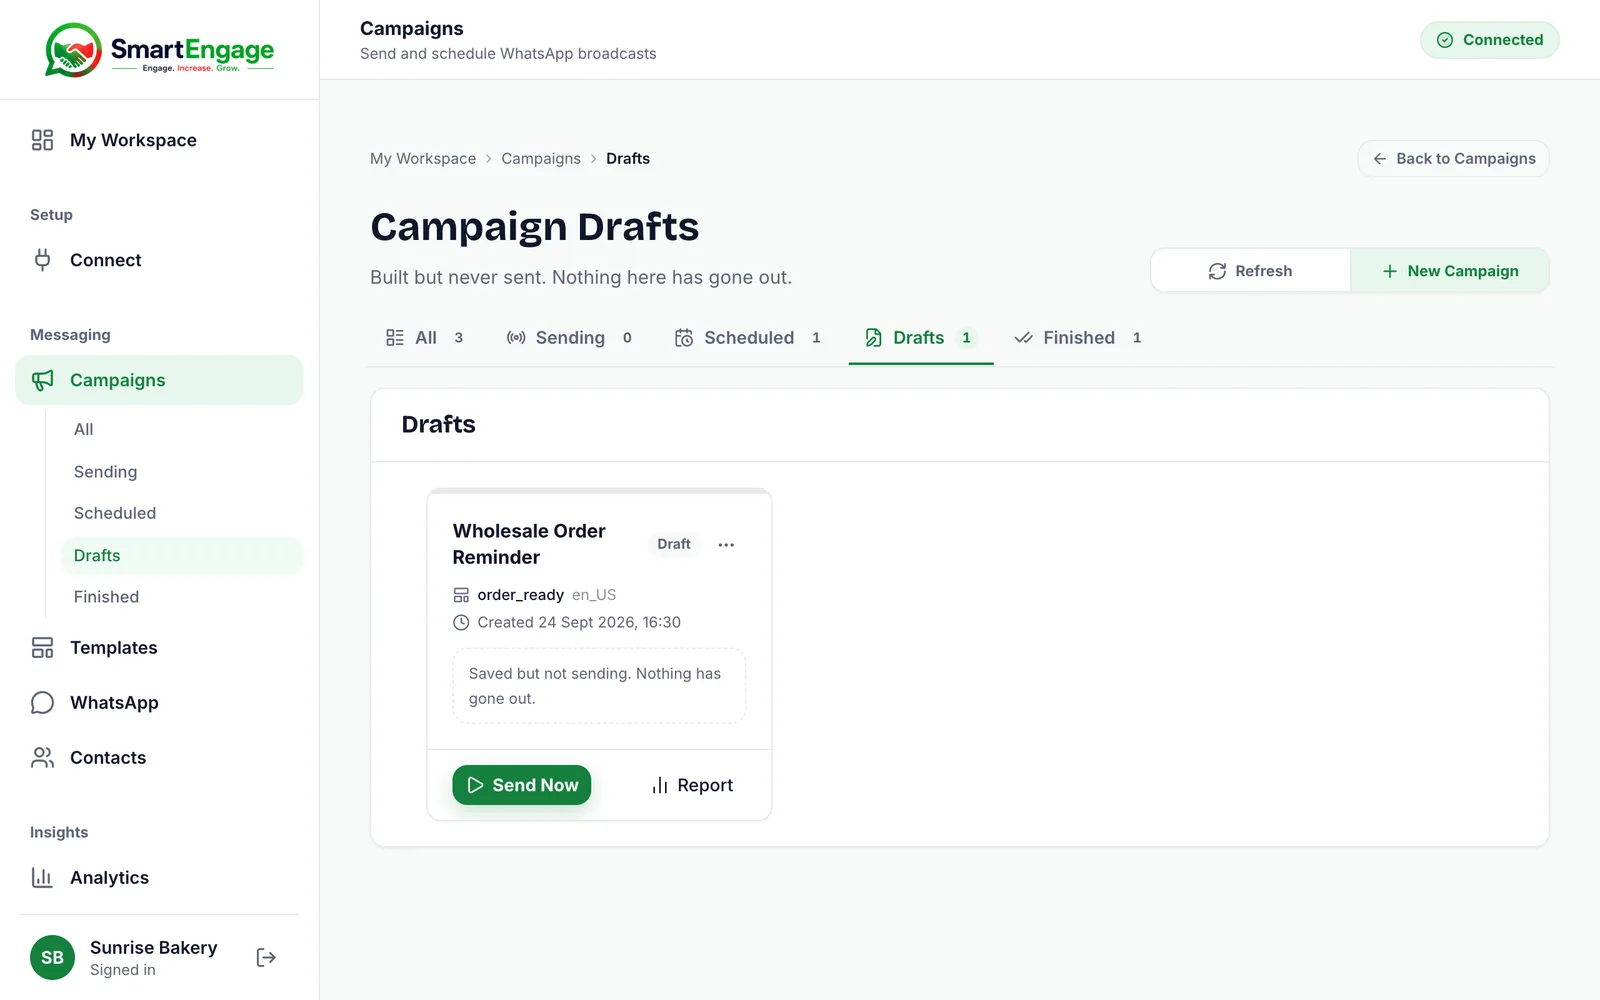
A saved campaign keeps the template, values and audience you chose. There is no edit screen after that point, so if something needs to change, build a new campaign. Campaigns cannot be deleted, so an unwanted draft can simply be left in Drafts or cancelled.
What Happens After You Send
SmartEngage checks the essentials once more on its own side: that your number is connected, that Meta reports the account can send, that the template is still approved and that the values match it. It also confirms your plan has campaigns and recipients left for the current period.
The campaign then shows as "Preparing" while the recipient list is built, and "Sending" while messages go out. You are taken back to the campaign list, where the new campaign is highlighted. When every recipient has been attempted, it becomes "Completed" and moves to the Finished tab.
Next Steps
Once a campaign is running, you can pause, resume or cancel it, and open its report to see exactly what happened to each message.
Learn the controls in How to Start, Pause, Resume or Cancel a Campaign.
When it has finished, read How to Read Your Campaign Results.
Tagged
Bulk MessagingCampaignsGetting StartedReady to send safely?
Start free — no new number, no setup fee, no card required.
Keep Reading
 Account & WhatsApp Setup5 min read
Before You Connect WhatsApp: What You Need
Most failed WhatsApp connections fail for a reason that could have been fixed beforehand. Here is what to have in hand before you click Connect With Facebook.
Read guide Troubleshooting6 min read
Fixing Contact Import Problems
Symptom-by-symptom fixes for SmartEngage contact imports: files that will not upload, wrong column mapping, rejected numbers, duplicates and imports that stop.
Read guide Account & WhatsApp Setup5 min read
How to Add a Payment Method for WhatsApp
Connected but nothing sends? Meta bills WhatsApp messages itself, and needs a payment method on the right business portfolio. Here is how to add one and confirm it in SmartEngage.
Read guide