
How to Create and Manage Contact Books
Contact books are how you split your WhatsApp audience into lists you can send to. This guide walks through creating a book, renaming it, moving contacts from one book to another and deleting a book you no longer need, including what happens to the contacts inside it.
SmartEngage
Every SmartEngage account starts with one book, My Contacts, and that is enough to get going. As your list grows, separate books let you send an offer to one city, a restock notice to one customer group or a newsletter to subscribers only, without building the audience from scratch each time.
All of the steps below happen on the Contacts page of your dashboard.
For how contacts, books and consent fit together, read How Contacts and Contact Books Work in SmartEngage.
Before You Start: Plan Your Books
A contact can be filed in one book at a time, so think of books as the main way you divide your audience. Good books usually follow the campaigns you actually send:
- By location, such as "Nairobi customers" and "Mombasa customers"
- By relationship, such as "Wholesale buyers" and "Retail customers"
- By interest, such as "Newsletter subscribers" or one book per product line
You can always rename books and move contacts later, so there is no need to get this perfect on day one.
Step 1: Create a Contact Book
At the bottom of the book list on the left, select "New Contact Book". A dialog opens with two fields:
- Name: required, up to 80 characters. A counter shows how many you have used.
- Description: optional, up to 240 characters. It appears under the book's name when you open it, and helps colleagues understand who the book is for.
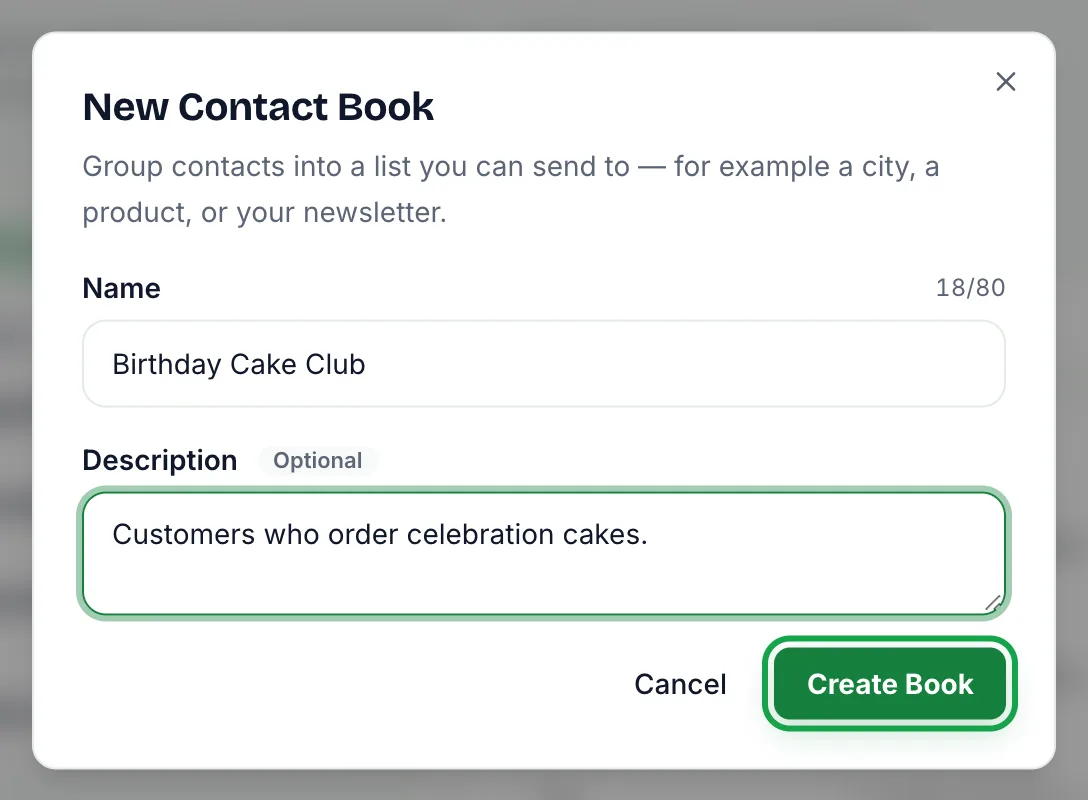
Select "Create Book". The new book appears under "Your Books" and opens straight away, ready for you to add or import contacts.
Two books in one account cannot share a name. If you try, SmartEngage tells you that you already have a contact book with that name, and nothing is created.
Step 2: Fill the Book
With the book open, use the buttons at the top of the page:
- Add contact, to enter one person by hand
- Import Contacts, to bring in a file or connect an app
Both start with the book you have open selected as the destination. The add form says which book the contact will be added to, and the import panel has a Contact book picker with the reminder that everything imported in that run is added to the chosen book. You can switch the destination in either place before you save.
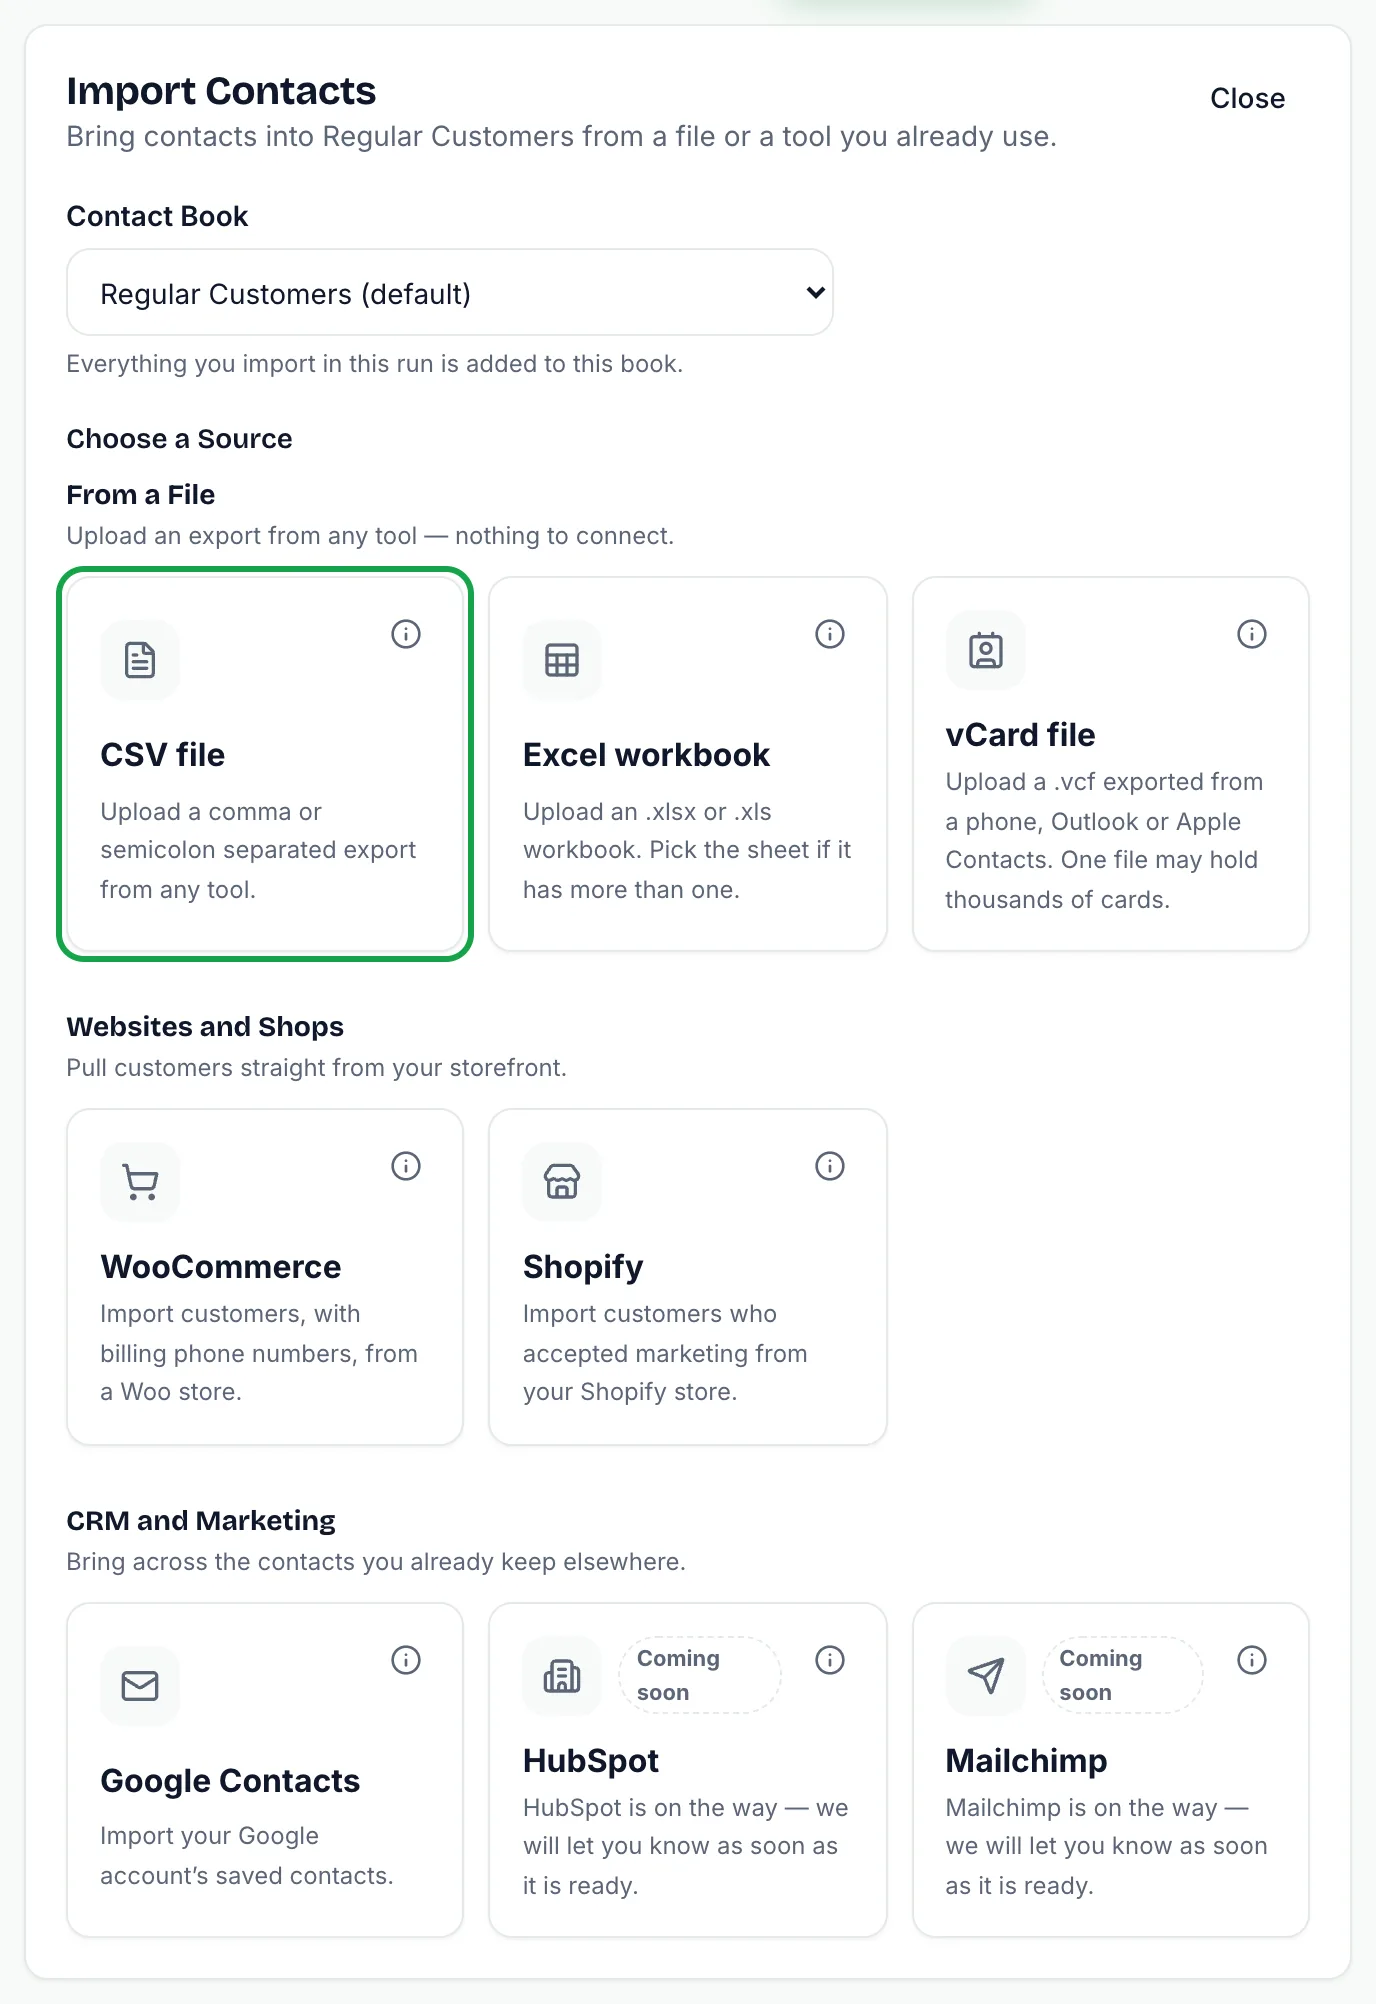
If you start from the "All Contacts" view instead, the destination starts on your default book.
For a full walkthrough of a file import, see How to Import Contacts from a CSV File.
Step 3: Rename a Book or Change Its Description
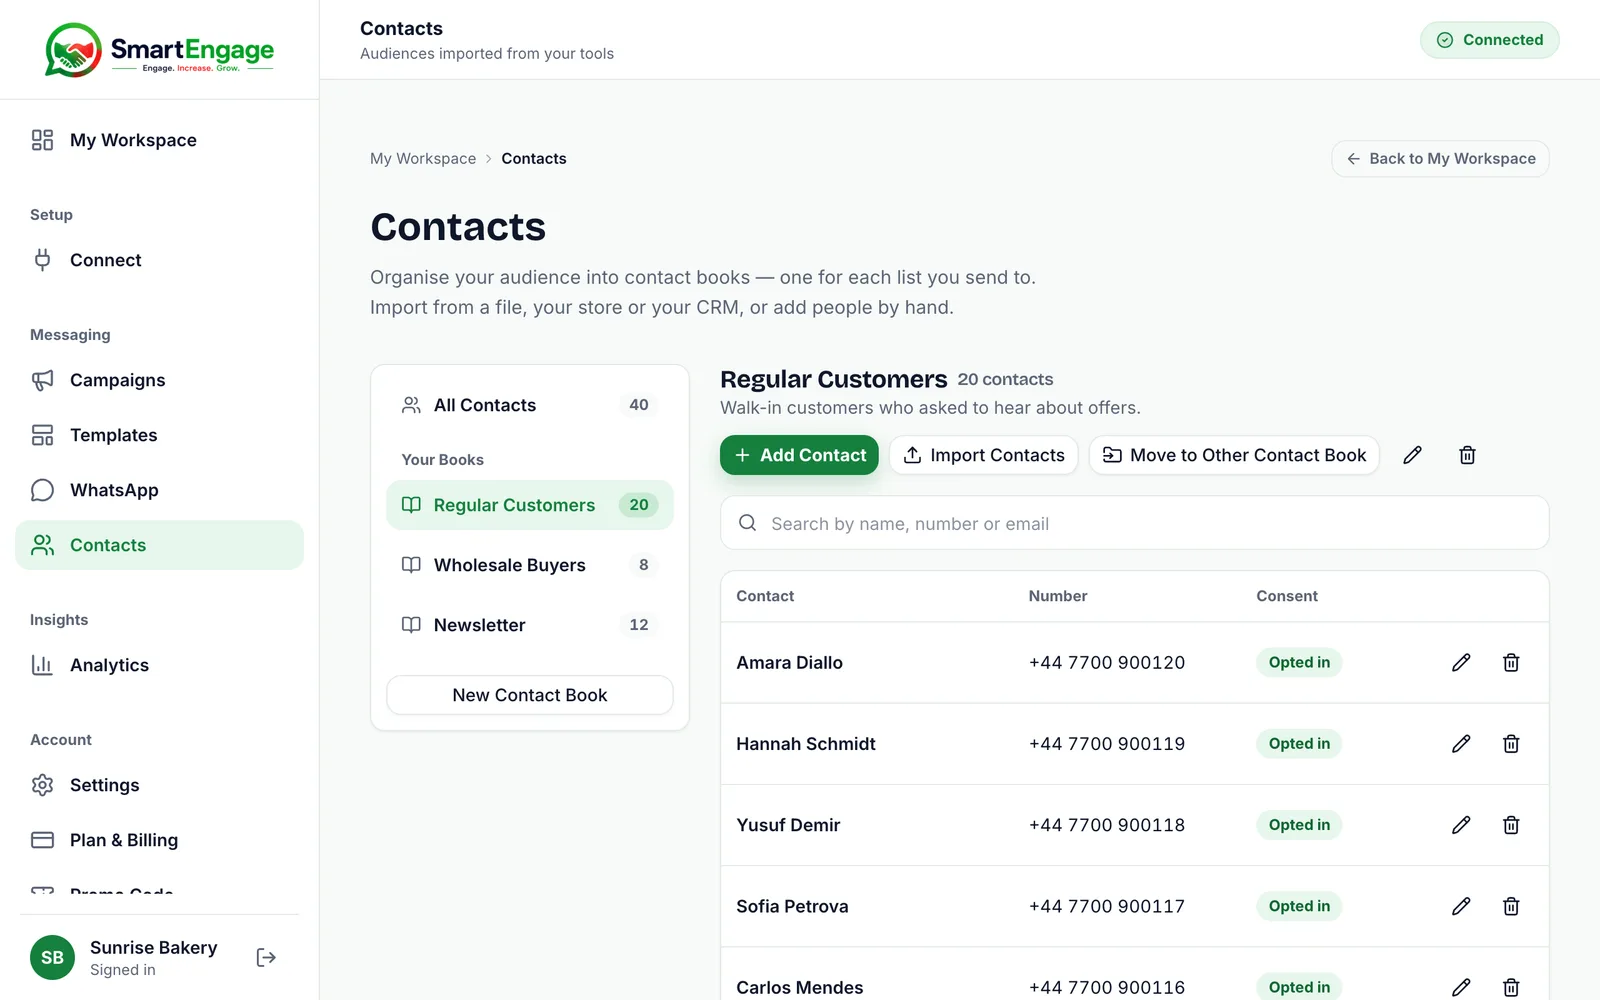
Open the book, then select the pencil icon at the top right of the page. The "Rename Contact Book" dialog opens with the current name and description filled in. Change either one and select "Save Changes".
Renaming changes nothing else. As the dialog says, the book's contacts stay where they are.
Step 4: Move Contacts to Another Book
To refile people, open the book they are in and select "Move to Other Contact Book". This button appears only when you are in a real book that has contacts, and you have at least one other book to move them to.
A bar appears above the table and a tick box appears beside every contact:
- Choose the destination in the "Move to" list. The book you are in is not offered.
- Tick the contacts to move. The tick box in the table header selects every contact on the current page.
- Your ticks are kept as you page through the book or search it, so you can build a selection larger than one page of 50.
- Select "Move". Up to 1,000 contacts can be moved at once.
When the move finishes, SmartEngage confirms how many contacts were moved and to which book. Contacts that were already in the destination are not counted. Select "Cancel" at any time to leave without moving anything.
Step 5: Delete a Book
Open the book and select the bin icon at the top right of the page. A confirmation dialog asks whether you want to delete the book and tells you exactly what will happen to its contacts. Select "Delete Book" to confirm.
What Happens to Contacts in a Deleted Book
Deleting a book never deletes the people in it. The confirmation says so plainly: the book's contacts will be kept and moved to Not in a Book. If the book is empty, the dialog tells you nothing else changes.
After the delete, a "Not in a Book" entry appears in the book list with the number of unfiled contacts. Those contacts still appear in "All Contacts", can still be searched, and are still included when a campaign is sent to All Contacts. The Move tool works from inside a real book, so it is not offered in the Not in a Book view.
To file one of these contacts in a book, open the Not in a Book view, press the pencil Edit button on its row, choose the book under Contact Book and press "Save Changes". To file many at once, import them into that book with the option to update the contacts you already have switched on, and they are moved into it.
If you want the contacts gone as well, remove them individually with the bin icon on each row. Removing a contact cannot be undone.
Deleting Your Default Book
You are allowed to delete My Contacts, or whichever book is your default. Its contacts are kept, exactly as with any other book. The next time a contact is added without a book chosen, SmartEngage makes your oldest remaining book the new default, or creates a fresh My Contacts book if you have no books left.
Tips for Keeping Books Tidy
- Use the description to record where a list came from and whether its members opted in.
- Keep a small book of your own team's numbers, so you can send yourselves a test campaign before a real one.
- Check the "Not in a Book" view after deleting a book, so no one is left unfiled by accident.
- Remember that a book's count includes opted-out contacts. The campaign audience step shows how many of them will actually be reached.
Related Guides
To put people into your new book, read How to Add and Edit a Contact.
To send to one book, see How to Choose Who Receives a Campaign.
When the book is ready to send to, read How to Create a WhatsApp Campaign.
Tagged
AudienceContactsGetting StartedReady to send safely?
Start free — no new number, no setup fee, no card required.
Keep Reading
 Account & WhatsApp Setup5 min read
Before You Connect WhatsApp: What You Need
Most failed WhatsApp connections fail for a reason that could have been fixed beforehand. Here is what to have in hand before you click Connect With Facebook.
Read guide Troubleshooting6 min read
Fixing Contact Import Problems
Symptom-by-symptom fixes for SmartEngage contact imports: files that will not upload, wrong column mapping, rejected numbers, duplicates and imports that stop.
Read guide Account & WhatsApp Setup5 min read
How to Add a Payment Method for WhatsApp
Connected but nothing sends? Meta bills WhatsApp messages itself, and needs a payment method on the right business portfolio. Here is how to add one and confirm it in SmartEngage.
Read guide